Tuesday, October 30, 2012

Halloween Pumpkin House Embellishments

EZ3DPopUps Halloween Pumpkin House Embellishments

Whoops, forgot to include the embellishment for the front of the Pumpkin House card.

The front of the card can be decorated in many ways.  Stamping, patterned papers, Washi tape, ribbon, fabric, layered colored cardstock etc. are all great ways to finish this card.  For those who do not have access to these items, I have included two images that are suitable for the front of the card. The graphics  I used came from The Graphics Fairy website.  Do visit her site and enjoy the huge selection of free graphics she offers there.

If you have used a corner punch on the other card parts, it's a good idea to continue with the top print embellishment.  (I used the Fiskars' medium Decorative Corner Lever shown in the first post of this series.) If you chose to use a corner punch, make sure you cut away the thin border line as you cut out the image. If you are not using the punch, you may choose to leave the border line intact.
I chose this variation because the color theme is more closely connected to the inside card colors.
The green color is prettier "in person" but because of the reason I mentioned above, I chose the other card for the front.  I included this variation just in case you would like a choice of front pieces.
The second page of the PDF template has "sidewalk strips" that can be glued over the existing sidewalk on the inner card.  One will permit you to write your own message, and two other strips have text suitable for a party invitation. 

Good luck!  To finish the card, go to the next post.   Have fun and do let me know if you have any questions or suggestions!

Contacting me: To leave a comment, click on the word Comments in the box below the post. All comments are approved by me before publishing. You may also e-mail me directly by clicking on the e-mail icon. If you enjoy collecting these patterns and don't want to miss one, PLEASE follow me by e-mail and add my e-mail address to your address book. Look for the red arrow in the right hand column. Fill in the e-mail box and click submit. Your e-mail address will never be sold or distributed or used for any reason other than sharing EZ3D content and news. If you have a Facebook account, would you please take a few seconds and like me on Facebook. Thanks so much and have fun!

Pumpkin House Halloween Card Gluing Tutorial

How To Glue The Pumpkin House Card Together

You will find the Pumpkin House Halloween Card templates here.

http://ez3dpopups.blogspot.com/2012/10/3rd-annual-fiskateers-orange-blog-hop.html

The folding instructions are HERE.


Score the outer card, fold and crease; open to a 90° angle.
Insert the fold of the inner card snugly against the fold of the outer card.  Use the orange sidewalk to help line it up.
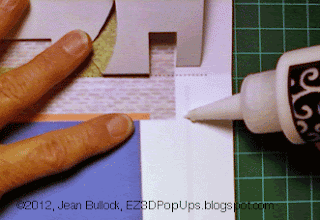
Lift the grassy flaps and put a dab of adhesive underneath each flap. Let dry.
Lift the orange side walk of the inner card and add glue underneath.
Lift grassy end corners and add glue.  Let dry.

Rotate card, lift inner card and sparingly apply glue to gray lines.
Rotate card and close.
Press and smooth over the glued area.
Lift edge of card.
Apply glue to gray lines as before.
Close card.
Press and smooth over glued area.
Overhead view of card.
Contacting me: To leave a comment, click on the word Comments in the box below the post. All comments are approved by me before publishing. You may also e-mail me directly by clicking on the e-mail icon. If you enjoy collecting these patterns and don't want to miss one, PLEASE follow me by e-mail and add my e-mail address to your address book. Look for the red arrow in the right hand column. Fill in the e-mail box and click submit. Your e-mail address will never be sold or distributed or used for any reason other than sharing EZ3D content and news. If you have a Facebook account, would you please take a few seconds and like me on Facebook. Thanks so much and have fun!

Monday, October 29, 2012

Halloween Pumpkin House Folding Tutorial

Halloween Pumpkin House Folding Tutorial by EZ3D PopUps 


Here is the "picture" version of the Halloween Pumpkin House folding tutorial.  Please see the previous post for the template.

Start at the bottom of the card. 


1. Valley Fold the wall forward.  You can use a ruler to help you.
2. Mountain fold  the top of the wall (backwards.)
3. Rotate the card and set it down on the sky part of the card. Valley fold the white strips forward.
4. Valley fold the orange strips forward.
Close the card.
Smooth the creases.
5. Lift the witch and pumpkins so they stick up away from the grass
and bend the dotted line slightly.
6. Put  your fingers behind the welcome mat, push it to a 90° angle.
7. Lift the little pumpkin up slightly then grasp the pumpkin house with fingers and thumbs and pull it toward you until the roof and little pumpkin lies flat.
8. Rotate the card, slip your fingers behind the witches and pumpkins, and thumbs under the grassy area, squeeze together, moving to the center of orange sidewalk.
9. Rotate again. Bend the wall/grass forward to crease the line.
10. Pinch to crease the line of the grass and bottom of pumpkin on each side.
11. Close card by the edges. The little roof pumpkin will pop up as you pull the card edge down. Pull the pumpkin house forward again and press the back of the sidewalk tab down. 
12. Hold down and smooth all the folds.
13. Turn over and smooth again
14. Put your thumb on the sidewalk and your forefinger on the orange sidewalk
and open the card to 90°.
You are now ready to attach it to the outer card. For gluing instructions, go to  http://ez3dpopups.blogspot.com/2012/10/pumpkin-house-halloween-card-gluing.html

 Contacting me: To leave a comment, click on the word Comments in the box below the post. All comments are approved by me before publishing.  You may also e-mail me directly by clicking on the e-mail icon.    If you enjoy collecting these patterns and don't want to miss one, PLEASE follow me by e-mail and add my e-mail address to your address book. Look for the red arrow in the right hand column. Fill in the e-mail box and click submit. Your e-mail address will never be sold or distributed or used for any reason other than sharing EZ3D content and news. If you have a Facebook account, would you please take a few seconds and like me on Facebook. Thanks so much and have fun!

Friday, October 26, 2012

3rd Annual Fiskateers Orange Blog Hop

 Welcome to the Third Annual Fiskateers ORANGE Blog Hop!  Update: 10/30/2012.

If you're hopping along, you should have come from Sue in CT #6150 http://www.sueinct.blogspot.com .   
(If you are joining us in the middle, go to http://www.fiskateers.com to start from the beginning.)  

Today we are celebrating Fiskars' signature color, ORANGE.  Almost everyone is familiar with Fiskars' famous orange-handled scissors, but Fiskars makes so many other wonderful products for crafting, sewing, gardening, and more.  Each stop along our Hop will feature different Fiskars' products with a big helping of ORANGE!  


For more information about Fiskars and the Fiskateer program, you can go to http://www.fiskateers.com/join/ .   Now, hop along to the next stop – Emily K #7021   http://emily.kincke.com


Today's project is an 

Origamic Architecture style  pop-up Halloween card.

The card is my original design but I did use graphics from other sources.
The cats, pumpkins, little witches and children are from http://www.doverpictura.com/ .  
The Halloween poster on the pumpkin door and the witch/moon is from http://www.graphicsfairy.blogspot.com

Materials needed: Templates, card stock, craft knife, ruler, corner punch, adhesive.

Download the inner card template PDF.                       Download the outer card template PDF.

Download scoring and cutting instructions PDF.       Download folding instructions PDF.

Downloading instructions: Save the template to your computer and then print. (Google Docs does not always print PDFs correctly.)  If you see parts of the image missing, it may be that you are using a browser that needs updating. Don't worry, just download them and they should be OK.

Printing tips.   If you use Adobe PDF Reader, use these settings: Page Scaling None, make sure the Auto Rotate and center is NOT selected,  Click on Advanced and select: Print As Image.  If you have a Mac and use Preview, it should print out OK.

For the illustrated folding tutorial, go to
 http://ez3dpopups.blogspot.com/2012/10/halloween-pumpkin-house-folding-tutorial.html

©2012, Jean Bullock, Ez3DPopUps.blogspot.com 
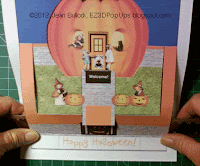
Bottom view of lower inside card.  You can see the little witches and the fold of the wall, step and top of the pumpkin house.
Top half of the bottom of lower inside card.  Here you can see the side walls , the step, and the pumpkin.
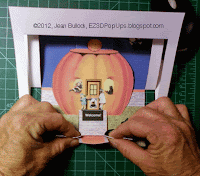
©2012, Jean Bullock, EZ3DPopUps.blogspot.com   This is an overhead view of the card.  The sidewalk in front of the house can be customized.

The Fiskars tools I am using are the Fingertip Control Precision Knife and the new Decorative Corner Lever Punch/Medium Cutting Radius.  Both tools are awesome!


Contacting me: To leave a comment, click on the word Comments in the box below the post. All comments are approved by me before publishing. If you would like me to contact you directly, let me know that and include your e-mail address in the comment box. I do not publish comments with e-mail addresses, so your address is safe. If you enjoy collecting these patterns and don't want to miss one, PLEASE follow me by e-mail and add my e-mail address to your address book. Look for the red arrow in the right hand column. Fill in the e-mail box and click submit. Your e-mail address will never be sold or distributed or used for any reason other than sharing EZ3D content and news. If you have a Facebook account, would you please take a few seconds and like me on Facebook. Thanks so much and have fun!

Monday, October 8, 2012

Halloween Pop Up Card Update

In Progress Pop Up Halloween Card

Sorry for the long delay in posting, folks.   Just wanted to let you know I am hard at work creating a new template for you.  Here is a sneak preview.  It isn't quite right yet, but it's getting there.


 Most of the architectural components have been designed by me, except for the grass and brick fills. The spiders, bats, cats and ghosts are images from the free Tuxpaint application available from http://tuxpaint.org .  The cat poster is from http://graphicsfairy.blogspot.com/ .  The pumpkins are from the Dover Pictura Store   http://www.doverpictura.com  .

I will be moving the pumpkin and tombstones around a little to add more stability to the pop out porch. There will be backing paper behind the door and a few more minor tweaks.  Please stay tuned. You will find more updates as they happen at  https://www.facebook.com/Ez3dPopUps  .


 Contacting me: To leave a comment, click on the word Comments in the little box below the post. All comments are approved by me before publishing. If you would like me to contact you directly, let me know that and include your e-mail address in the comment box. I do not publish comments with e-mail addresses, so your address is safe. 

 If you enjoy collecting these patterns and don't want to miss one, PLEASE follow me by e-mail and add my e-mail address to your address book. Look for the red arrow in the right hand column. Fill in the e-mail box and click submit. Your e-mail address will never be sold or distributed or used for any reason other than sharing EZ3D content and news. If you have a Facebook account, would you please take a few seconds and like me on Facebook. Thanks so much and have fun!