 |
Three Sided Corner Gift Card Valentine Repost from 2013
This is three-sided corner card has a built-in pocket for a gift card or any other flat thing you would like to insert. Once opened, the card stands up by itself.
 |
| Inside of the Valentine |
|
It's based on the Mother's Day card that I presented last year, but the template and directions have been improved. The graphics are from Dover Pictura. My printer doesn't always match the colors on my screen, so the image you see above is what prints out on mine, but the PDF colors look a little different than what I see in the PDF. The colors on this card are suitable for either a male or female. As with the Mother's Day card template, there are alternate squares that will enable you to customize the card to your liking. I hope you enjoy this three-sided corner Valentine gift card/holder. This time I have included a template for a matching envelope as well.
Materials needed:
Printed pattern/template
Download the pattern HERE.
scissors (or other cutting equipment,)
a scoring tool (I use a steel crochet hook for mine,)
adhesive (double side tape or glue.)
ruler
Directions
Cutting
Cut out the pieces you need. I have now included a thin black line around the edges of the patterns. Cut directly in the middle of the black lines.
Scoring
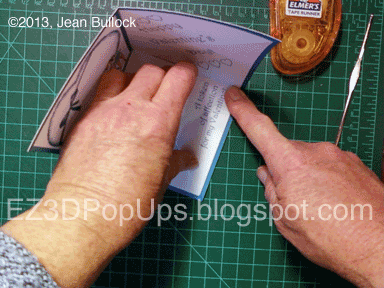
You no longer need to score on the back of the card, just score directly on all of the dotted lines. If you don't have a scoring tool or thin bone folder, you may use a butter knife, screwdriver, empty ball point pen or similar objects. I like to use a steel crochet hook. Line up the ruler along side the dotted lines. (It helps to put your scoring tool on the line first and slide the ruler up against it.) Hold the ruler down with one hand, then with the scoring tool, press firmly and drag on the dotted lines.
 |
| Score vertically. |
 |
| Score horizontally. |
 |
| Score diagonally. |
 |
| Score diagonally. |
Folding
Fold the card in half vertically, crease the fold firmly.
Open the card and fold in half horizontally, crease the fold firmly.
Open the card, and pinch the diagonal score line forward into a mountain fold.
Crease the fold firmly. Repeat with the other diagonal score line.
 |
| Bottom outside corners together. Crease fold firmly. |
 |
| Push flap down. Crease fold firmly. |
 |
| Push flap in. Crease fold firmly. |
 |
| Fold top down. Crease fold firmly. |
This video help you understand the complete folding process.
Everytime you make a fold, remember to crease it firmly.
Gluing the Card
(Important! If you wish to write something on the inside of the card, be sure to write it before you apply the adhesive!)
I like to use double sided tape. White glue is good too but remember to hold it down firmly until it dries.
 |
| Apply adhesive to bottom of right triangle. Avoid putting adhesive on the folds. Stop just short of them. |
 |
| Match the bottom corners and press firmly. |
 |
| Repeat the process. Avoid putting adhesive on the folds. Stop just short of them. |
 |
| Fold the flap down and press firmly. You have now created the pocket for the gift card. |
 |
Slide the gift card in the pocket. Avoid the area where you put the adhesive.
|
 |
| Embellish the top of the card, or choose from the blank panel,the graphics panel or the sentiment panel. All three are a tiny bit larger than the card to cover up marginal folding errors. |
 |
Line up the corners to make sure the panel
is facing the right way. |
 |
Apply adhesive along all four sides of the card top.
Center the decorative panel carefully and smooth along the edges. |
Creating the Envelope
Cutting
When cutting the envelope piece out, cut on the middle of the black line that surrounds the piece.
Scoring
 |
| Score on the dotted line in the middle of the card. |
 |
| Use the border of the blue frame to score the side flaps. |
 |
Use the border of the blue frame to score top envelope flap.
|
 |
| Fold on the scored line. Crease the fold firmly. |
 |
| Fold side flaps inward. Crease the folds firmly. |
Gluing
 |
Put adhesive along the side edges of the bottom flap.
Begin and end the adhesive about 1/4 inch from the fold and the bottom edge. |
 |
| Fold bottom of envelope upwards onto the side flaps. |
 |
| Smooth the edges down and press firmly. |
 |
| Insert card. |
 |
| Add adhesive to stick down the flap or use a sticker to hold it down. |
 |
| Front of the envelope. |
I hope you enjoy this pattern. Happy Valentine's Day!
Contacting me: To leave a comment, click on the word Comments in the box below the post. All comments are approved by me before publishing. You may also e-mail me directly by clicking on the e-mail icon. If you enjoy collecting these patterns and don't want to miss one, PLEASE follow me by e-mail and add my e-mail address to your address book. Look for the red arrow in the right hand column. Fill in the e-mail box and click submit. Your e-mail address will never be sold or distributed or used for any reason other than sharing EZ3D content and news. If you have a Facebook account, would you please take a few seconds and like me on Facebook. Thanks so much and have fun!


