Sunday, April 29, 2012

EZ3D PopUps Mother's Day Gift Card Tutorial

EZ3D PopUps Mother's Day Card Tutorial

 (Improved Video)


I am not going to publish all the instructions for the card here.  Please download the instructions from the previous post and use these videos to help clarify them.  

Scoring Cards

Scoring is achieved by either indenting or lightly cutting the surface of the paper or cardstock.  In the previous OA lessons, we scored the paper by bending the flaps back and forth.  That caused an indentation that helped us make the folds crisper.  There are scoring tools available but if you don't have any of those you can make do with a dull butter knife (turn it upside down if it has serrated edges) or even a flathead screwdriver. We want the printed side of this template to have valley folds, so we score them from the front. For this project, I recommend scoring by indenting rather than cutting, pressing down firmly.  Make sure you have something under your card when you score.  If you don't have a cutting mat, try putting a piece of cardboard underneath the card.


After scoring and creasing the perpendicular lines, flip the paper over and use the creased lines to help you set up the diagonal lines for scoring.  We are scoring the diagonals from the back so it will help create the mountain (ridge) folds on the printed side of the template. This will make the creasing easier. However, if you find the process too challenging, you can score from the front.  You will just have to work a little harder to make the mountain folds.


Once you have scored the diagonals, flip the paper over and crease the diagonals. I ran out of my 65 lb cardstock and used 100 lb cardstock instead, so folding the crease was a little harder than usual.  You should have no problem with 65 lb cardstock.  Line everything up in the final fold position and smooth all creases.  If you are going to write a message directly on your card, you should do that before you glue.


Now it's time to apply the adhesive.  I used a Scotch advanced Tape Glider. If you choose to use a tape runner make sure the adhesive is clear and not colored.  I recommend using some kind of glue for the top panel.  You have a few seconds to line everything up better.

After you have glued the triangular flaps together, you will be able to see how the pocket is formed.  The gift card, money, picture or whatever you choose to insert there will be very secure and will not fall out.   Now it's time for the top of the card to be decorated. You will see your choices in the next video.


For the finishing touch, add a pretty bow and wrap the card up like a present.  See the previous post for an example.  You can also add embellishments  - anything you want.  BUT don't put anything on crease that bends inward.


I hope this was helpful to you.  If you appreciated this lesson, please go to https://www.facebook.com/Ez3dPopUps   and like my page.  I hope you will post pictures of the cards you made.  Happy Mother's Day!
Saturday, April 28, 2012

EZ3D PopUps Mother's Day Gift Card

EZ3D PopUps Mother's Day Gift Card


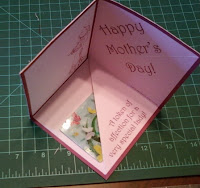
This Mother's Day Card is a 3 sided corner card designed to stand up and display the interior of the card.  On the bottom panel is a built-in gift card pocket.  The card is customizable and you can add embellishments.  There is only one place where embellishments cannot be added.

3 sided corner card
The gift card pocket is formed with
mountain/ridge folds and glued down.
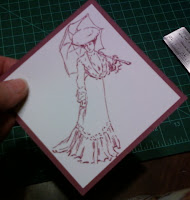
The graphic is a lady holding a
parasol. The card stands alone,
displaying the interior.


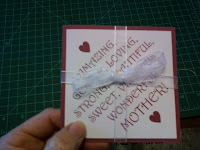
Mother's Day Card Front with Bow
A delicate bow adds the finishing touch to
this simple but lovely card.


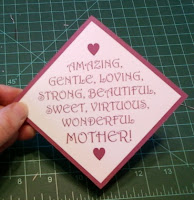
Mother's Day Card Front

Decorate the top of the card yourself or choose a graphic, text or blank square.


Materials needed: Templates, 65 lb cardstock or similar printing paper, scissors, ruler, scoring tool -
a dull butter knife or flathead screwdriver 
can be used if you don't have a scoring tool. 


I have divided the template into 3 sections for faster downloads.  Click on the links below to download the pdf files.

 Cardbase here.          Decorative panels here.       Instructions here.

If you would like the jpg files of this pattern, a different color, a black and white version, or a plain diagram with no text or decoration,  please leave me a comment at the end of this post and follow me by e-mail so I can get them to you as soon as possible.  

These templates are free and if you appreciate them, would you please click on the Twitter, Google +, Facebook buttons and share them?  If you have a Facebook account, would you please visit and LIKE my page at  https://www.facebook.com/Ez3dPopUps  .  I would love to read your comments. 


Thursday, April 12, 2012

EZ3D OA PopUps Lesson 12

EZ3D OA PopUps Lesson 12

Materials needed:  Template and scissors.

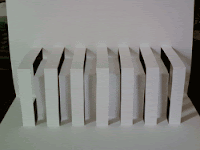
Ready for another one?  This time we will create an interesting effect with narrow flaps.  Although I used regular 20 lb printer paper for the prototypes, this template will work better with 24-28 lb printer paper, thin cardstock or index card because the flaps will be narrow this time.  

Pay careful attention to the folds for the shorter strips and make sure they are going in the right direction.   Use the grid lines to help you line up the flaps with each other.  Have fun!


Monday, April 9, 2012

EZ3D OA Pop Up Grid

EZ3D OA Pop Up Grid

Materials needed:  Grid Template, pencil, scissors.

This isn't a lesson really.  More of a challenge.  Try designing your own OA Pop Up.  Try using shapes, angles, anything you want.  Fold the page in half and then draw the shapes you want to popup.  If you want a shape to pop up, remember to start your cuts from the folded edge and leave a spot at the top of the shape where it can be folded up.  Just look at the previous templates to get an idea. The more you experiment, the better you will become.  You can use graph paper to help you or download the grid template.  Have fun!


EZ3D OA PopUps Lesson 11 Circle and Line

EZ3D PopUps OA Lesson 11 Circle and Line

Materials needed: Template and scissors.  (PDF file recommended.)

Time for more fun.  This time we are going to try something different.  The end product will be 3 circles with lines in the center that pop beyond the circles.  This template works with standard copy paper but if you can use 24 or 28 lb paper, that would be even better. Even though this is a new concept, the same procedure is used.  The instructions are on the template.

If you have been enjoying my templates, would you be so kind as to click on the Facebook, Twitter or Google buttons that are in the box beneath the post.  Click on the word comments to make one.  Please remember that if you are a minor, you should not include your last name or I can't publish the comment.   

Thanks.  Have fun.  More templates coming.


Sunday, April 8, 2012

EZ3D OA PopUps Lesson 10 Shapes

EZ3D OA PopUps Lesson 10 Shapes

Materials needed:  Template and scissors  (I recommend the PDF template because of its smaller file size.)

Hello, Everybody!  Something different this time.  Although we have done some angled cutting, we will now try some simple shapes. This practice will come in handy when learning to design your own OA patterns.  The directions are on the template. Remember to cut carefully and crease all the folds firmly.
Have fun with this – another one is on its way!  


Saturday, April 7, 2012

EZ3D Popups OA Lesson 9 Step It Up

EZ3D Popups OA Lesson 9 Step It Up

Materials needed: Template and Scissors.  (Hint: PDF file sizes are smaller and easier to download.)

Hi, Everyone!  Back again with a new template.  This one isn't difficult but you will have to do a little extra crease pinching to help it to fold properly. The instructions are on the PDF and JPG files, but if you find you are not successful at this one, please let me know in the comments below and I will prepare a little video to help you better understand the process.

I hope you like the new symbols I have added to the template.   If you have found the templates I've made, and you have a Facebook account, I would appreciate it if you would go to https://facebook.com/EZ3DPopUps  and LIKE the page.

 Thanks! Have fun!  More templates coming soon!

Grandma Jean


Friday, April 6, 2012

EZ3D Pop Ups Origamic Architecture Lesson 8


EZ3D Pop Ups Origamic Architecture Lesson 8

Materials needed:  template and scissors

In the previous lesson, we combined vertical with angled cuts and created a chair-like shape.  This time we will shift the angled cuts to the center and the straight cuts to the outside.  The angles are the same but the outcome will be completely different.  All three shapes will pop up and forward but the central triangular shape will pop forward the most. 

No matter which direction you cut, the folds must usually be horizontal for the pop up to work properly.  Remember to cut as carefully as you can and to make a crisp crease when you create your folds.  Have fun!  Another template is on its way.


Thursday, April 5, 2012

EZ3D Pop Ups Origamic Architecture Lesson 7


EZ3D Pop Ups Origamic Architecture Lesson 7 

Materials needed:  template and scissors

In lesson 7, we will make another chair-like shape but with angled sides.  In our previous triangle lesson, we learned that we can make angled cuts as well as vertical.  Now we are going to combine vertical with angled cuts.  No matter which direction you cut, the folds must usually be horizontal for the pop up to work properly.  Remember to cut as carefully as you can and to make a crisp crease when you create your folds.  Have fun!  Another template is on its way.


EZ3D Pop Ups Lesson 6 Chair Shape

EZ3D Pop Ups Origamic Architecture Lesson 6 

Materials needed:  template and scissors

In lesson 6, we will make a flap within a flap and then pop it out.  It kind of looks like an overstuffed armchair. All the instructions are found on the PDF or JPG file. Remember to cut carefully and make crisp creases. Good luck and please come back and let me know how it turns out.