Wednesday, March 18, 2015

More Fun With Eileen Hull Designs Canister Die


I am having so much fun using Eileen Hull Designs amazing Canister Die.  One of the things I love about Eileen's dies is that they are so versatile.  As I was working with the Canister Die, I started getting ideas for other projects.  One of the projects I wanted to try making was a luminary.

The Kit N Clowder Facebook group was having a Fantasy Challenge, sponsored by the Flying Unicorn.  The challenge was to create a Fantasy project and if we included a unicorn in our project, we could get an additional entry.

Here is what I came up with:


I used Kelly Papers 100 lb white cover stock for the paper.  Because the cover stock was rather thick, knew I needed to create some openings for the light to shine through, so I used Sue Wilson's Eternal Rings striplet to acheive that.  The striplet die was narrow enough to use with the panel parts of Eileen's cannister die. I got a wonderful public domain unicorn image from Wikipedia and fussy cut it and adhered it to the front of the luminary.

The flowers were created with a Martha Stewart Hydrangea punch.  I used an embossing tool to give the flowers more dimension and added tiny self-adhesive half pearls to the centers and also to the pattern created by the Eternal Rings die and on the corners of the top and bottom of the  luminary.


 If you look closely at the photo above you can see the battery operated tea light I added.  The tea light is from Walmart.  Rather than open the luminary from the top, I created it to open from the bottom, so the  tea light could be easily accessed. 


For the top of the luminary, I used a beautiful filigree flower adornment from the Flying Unicorn and added a flower and pearl to the middle.  The lid is glued to the top of the luminary, which is really the bottom turned upside down.


 I love the effect of the lighted luminary.

I showed it to a colleague at work who asked me if I could make a night light for her new granddaughter.  And so ... I did!  Unfortunately, I got the name wrong on the panel I added, so I will be making another one this weekend.


In a few days, I shall share photos showing how I created these.

In closing, I would like to share how I met Eileen Hull.  We have been Facebook friends for several years.  This year I was able to attend the CHA convention in Anaheim, and while I was there, I wanted to say hello to Eileen, so I went to one of her make and take demonstrations.  After the demonstration, I went behind the counter to get my picture taken with Eileen.  We were having a fun chat, and a very nice lady approached the counter, and being in a jolly mood, I asked her if she would like to do a make and take.  Eileen let me show the lady how to do the project. I had so much fun.  Eileen videotaped it with her phone and shared it on Facebook.  Click HERE if you would like to see the video:

That's all for now.  Please check back in a few days if you want to see how I made these luminaries.


Contacting me: To leave a comment, click on the word Comments in the box below the post. All comments are approved by me before publishing. You may also e-mail me directly by clicking on the e-mail icon. If you enjoy collecting these patterns and don't want to miss one, PLEASE follow me by e-mail and add my e-mail address to your address book. Look for the red arrow in the right hand column. Fill in the e-mail box and click submit. Your e-mail address will never be sold or distributed or used for any reason other than sharing EZ3D content and news. If you have a Facebook account, would you please take a few seconds and like me on Facebook. Thanks so much and have fun!

Monday, March 9, 2015

Cool 3D Canister Using Eileen Hull Designs Die

Eileen Hull's scoreboard dies are fabulous.  I want to collect them all.  Here is my first completed project made with her cool Canister Die.  I am entering this project in the Eileen Hull Designs'  Art With Heart "Go Green" Challenge.  Click here to see the current challenge.  You do not need to use Eileen's dies to enter a project – but you get extra points if you do.  The prize for the winning entry is one of Eileen Hull's dies. Also, check out the Eileen Hull Designs' Facebook page. Eileen is very prompt in answering any questions you may have or replying to comments. She's a doll!


The dies are designed to work with Sizzix die-cutting machines.   There may be other machines that can work with these dies - be sure you check the specifications before purchasing these thicker dies.  I own the Sizzix Big Kick which is exactly the same machine as the Big Shot – just with a different name.  I don't have a tutorial for you today, I will have some in the future. I will also show you how I used regular size cutting plates with this dies, although I recommend that you DO get the extended cutting plates from Sizzix.

In the meantime, here is a link to Bona Rivera-Tran's video, showing how to put the die cuts together.  She also shares how to make a taller version of the canister. Very cool.  Definitely want to try that.  

Project materials and equipment used:

Sizzix Big Kick Die Cutting Machine
Thick white poster board.
Heidi Swapp's Favorite Things Lovely Lattice and 01159 Rainbow Rounds scrapbook papers
Elmers Craft Bond Adhesive Spray
Tattered Lace Detail Glue
Sizzix XL Canister Scoreboard die (Eileen Hull Designs)
Spellbinders Labels Twenty-Eight Nestabilities Dies
Special Moments Scrapbooking Stickers
Michaels Melodies and Lace Pearl Gems 

Hope you enjoyed my little project. See you next time. 

Contacting me: To leave a comment, click on the word Comments in the box below the post. All comments are approved by me before publishing. You may also e-mail me directly by clicking on the e-mail icon. If you enjoy collecting these patterns and don't want to miss one, PLEASE follow me by e-mail and add my e-mail address to your address book. Look for the red arrow in the right hand column. Fill in the e-mail box and click submit. Your e-mail address will never be sold or distributed or used for any reason other than sharing EZ3D content and news. If you have a Facebook account, would you please take a few seconds and like me on Facebook. Thanks so much and have fun!

Monday, January 19, 2015

Three-sided Corner Gift Card Valentine


Valentine Card Top View

Three Sided Corner Gift Card Valentine  Repost from 2013


This is three-sided corner card has a built-in pocket for a gift card or any other flat thing you would like to insert.  Once opened, the card stands up by itself. 


Inside of the Valentine

 It's based on the Mother's Day card that I presented last year, but the template and directions have been improved. The graphics are from Dover Pictura.  My printer doesn't always match the colors on my screen, so the image you see above is what prints out on mine, but the PDF colors look a little different than what I see in the PDF.  The colors on this card are suitable for either a male or female. As with the Mother's Day card template, there are alternate squares that will enable you to customize the card to your liking. I hope you enjoy this three-sided corner Valentine gift card/holder.  This time I have included a template for a matching envelope as well. 


Materials needed:

Printed pattern/template   Download the pattern HERE.
scissors (or other cutting equipment,)
a scoring tool (I use a steel crochet hook for mine,)
adhesive (double side tape or glue.)
ruler

Directions

Cutting

Cut out the pieces you need. I have now included a thin black line around the edges of the patterns.  Cut directly in the middle of the black lines. 

Scoring

You no longer need to score on the back of the card, just score directly on all of the dotted lines.  If you don't have a scoring tool or thin bone folder, you may use a butter knife, screwdriver, empty ball point pen or similar objects.  I like to use a steel crochet hook.  Line up the ruler along side the dotted lines.  (It helps to put your scoring tool on the line first and slide the ruler up against it.) Hold the ruler down with one hand, then with the scoring tool, press firmly and drag on the dotted lines. 


Score vertically.
Score horizontally.


Score diagonally.
Score diagonally.


Folding
Fold the card in half vertically, crease the fold firmly. 
Open the card and fold in half horizontally, crease the fold firmly. 


Open the card, and pinch the diagonal score line forward into a mountain fold. 
Crease the fold firmly. Repeat with the other diagonal score line.
Bottom outside corners together. Crease fold firmly.

Push flap down. Crease fold firmly.

Push flap in. Crease fold firmly.

Fold top down. Crease fold firmly.
 This video help you understand the complete folding process.
Everytime you make a fold, remember to crease it firmly.

Gluing the Card 

(Important! If you wish to write something on the inside of the card, be sure to write it before you apply the adhesive!)


I like to use double sided tape. White glue is good too but remember to hold it down firmly until it dries.
Apply adhesive to bottom of right triangle.  Avoid putting adhesive on the folds. Stop just short of them.
Match the bottom corners and press firmly. 
Repeat the process. Avoid putting adhesive on the folds. Stop just short of them.
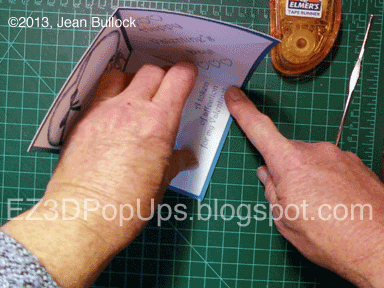
Fold the flap down and press firmly.  You  have now created the pocket for the gift card.
Slide the gift card in the pocket. Avoid the area where you put the adhesive.


Embellish the top of the card, or choose from  the blank panel,the graphics panel or the sentiment panel.  All three are a tiny bit larger than the card to cover up marginal folding errors.
Line up the corners to make sure the panel
is facing the right way.


Apply adhesive along all four sides of the card top.
Center  the decorative panel carefully and smooth along the edges.
Creating the Envelope

Cutting

When cutting the envelope piece out, cut on the middle of the black line that surrounds the piece.

Scoring

Score on the dotted line in the middle of the card.
Use the border of the blue frame to score the side flaps.
Use the border of the blue frame to score top envelope flap.
Fold on the scored line. Crease the fold firmly.

Fold side flaps inward. Crease the folds firmly.

Gluing

Put adhesive along the side edges of the bottom flap.
Begin and end the adhesive about 1/4 inch from the fold and the bottom edge.
Fold bottom of envelope upwards onto the side flaps.
Smooth the edges down and press firmly.
Insert card.
Add adhesive to stick down the flap or use a sticker to hold it down.
Front of the envelope.  
I hope you enjoy this pattern.  Happy Valentine's Day!

Contacting me: To leave a comment, click on the word Comments in the box below the post. All comments are approved by me before publishing. You may also e-mail me directly by clicking on the e-mail icon. If you enjoy collecting these patterns and don't want to miss one, PLEASE follow me by e-mail and add my e-mail address to your address book. Look for the red arrow in the right hand column. Fill in the e-mail box and click submit. Your e-mail address will never be sold or distributed or used for any reason other than sharing EZ3D content and news. If you have a Facebook account, would you please take a few seconds and like me on Facebook. Thanks so much and have fun!

EZ3D Pop-up Valentine Tent Place Card Repost


EZ3D Pop-up Valentine Tent Place Card. Quick and easy to make.
Quick and Easy Pop-up Valentine Tent Place Cards 
Repost from 2013

These pop-up tent place cards are super easy to make and are perfect for young children's Valentine parties!  The bears and hearts graphic is one I have edited and adapted from Dover Publications - a great place to get images.  For the message on the back, I used the Hole Hearted Font, courtesy of the most gracious and wonderful ANKE  ! This template has 4 cards on 1 page.  Instructions are also included on the second page.

Download template here.   Set your printer margins to 0 to be on the safe side.  For best results, resizing is not recommended.

Materials and tools needed:  Cardstock (to print template on), craft knife, scissors and ruler (optional.)

The directions are very simple.  Cut directly on the black lines to cut out the card.  With a craft knife, cut the upper part of the rectangle as shown in the photo below.   You may cut directly on the gray line or along the side of it.  Push the flap a little to make sure it is free of the rest of the card. Then fold the card back on the dotted black lines.


That's it!  You are done.  Happy Valentine's Day and happy cutting!

Contacting me: To leave a comment, click on the word Comments in the box below the post. All comments are approved by me before publishing. You may also e-mail me directly by clicking on the e-mail icon. If you enjoy collecting these patterns and don't want to miss one, PLEASE follow me by e-mail and add my e-mail address to your address book. Look for the red arrow in the right hand column. Fill in the e-mail box and click submit. Your e-mail address will never be sold or distributed or used for any reason other than sharing EZ3D content and news. If you have a Facebook account, would you please take a few seconds and like me on Facebook. Thanks so much and have fun!

Sunday, December 28, 2014

Treasured Times Digi-stamp Pop Up Card.

I created this pop-up card using a digi-stamp for a challenge in the Treasured Times Rubber Stamps Facebook group.  The group is open to the public and the members are wonderful and supportive.  Jody Stacy is the owner of Treasured Times Rubber Stamps and she keeps us on our toes with lovely challenges and lovely prizes as well.  Treasured Times Rubber Stamps offers digi-stamps and clear polymer stamps in addition to traditional rubber stamps.  If you enjoy this image, do pay a visit to her lovely blog at http://treasuredt.blogspot.com/

When I saw this delightful digi-stamp, I knew it would make a wonderful pop-up card.  Because the bottom legs of the wardrobe were quite slender, I created matching drawers to support the wardrobe.  The wall, floor and rug were colored digitally but the rest of the images were hand colored with Prismacolor pencils.  I also fussy cut some of the images and layered them over the base image to create a little more dimension.  I am sorry I cannot offer you a template as the digi-stamp is copyrighted but it may give you some inspiration to try something like this on your own.  Hope you enjoyed it.


Right click and open the image in another window and you will be able to see a larger photo.


Contacting me: To leave a comment, click on the word Comments in the box below the post. All comments are approved by me before publishing. You may also e-mail me directly by clicking on the e-mail icon. If you enjoy collecting these patterns and don't want to miss one, PLEASE follow me by e-mail and add my e-mail address to your address book. Look for the red arrow in the right hand column. Fill in the e-mail box and click submit. Your e-mail address will never be sold or distributed or used for any reason other than sharing EZ3D content and news. If you have a Facebook account, would you please take a few seconds and like me on Facebook. Thanks so much and have fun!